


Download Win32OpenSSL_Light-0_9_8k
Thursday, 22 November 2012
Implement Security In WCF
To Implement Security In WCF you need to ensure that Win32OpenSSL_Light-0_9_8k is installed on your computer. In addition, you need to copy the openssl.conf file in C:\OpenSSL\bin folder
To Download Win32OpenSSL_Light-0_9_8k click here
To Download openssl.conf click here
To Implement Security In WCF you need to ensure that Win32OpenSSL_Light-0_9_8k is installed on your computer. In addition, you need to copy the openssl.conf file in C:\OpenSSL\bin folder
To Download Win32OpenSSL_Light-0_9_8k click here
To Download openssl.conf click here
How to Copy, Delete a File in C# .NET
Saturday, 22 September 2012
You can copy a file quite easily. It's done with the File class of System.IO. Let's see how. First create a new folder on your C drive. Give it the name copiedFiles.
Add a new button to your form. Double click to get at the code, and set up the following files and directory paths:
string fileToCopy = "C:\\test1.txt";
string newLocation = "C:\\copiedFiles\\test1.txt";
string folderLocation = "C:\\copiedFiles";
string fileToCopy = "C:\\test1.txt";
string newLocation = "C:\\copiedFiles\\test1.txt";
string folderLocation = "C:\\copiedFiles";
So the file we want to copy is test1.txt and it is in the root folder of the C drive. We want to copy it to a new location. The folder (Directory) we want to copy it to is called copiedFiles. We added a Folder Location, because we want to check if this Directory exists.
To copy a file, you use the Copy method of the File class:
System.IO.File.Copy( fileToCopy, newLocation );
In between the round brackets of Copy, you need a file to copy and the new location of the file you're trying to copy.
When the error checking is done as well, our code looks like this:
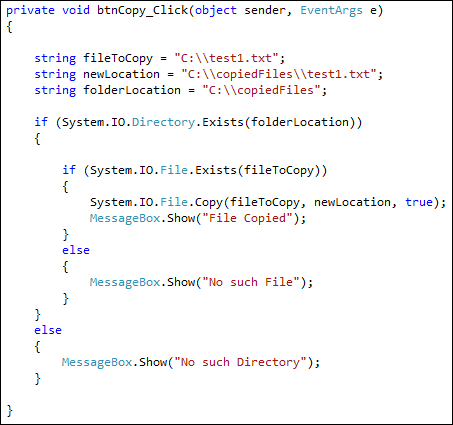
The code checks to see if the Directory exists. If it does, then we check to see if the file exist. If all is OK, then we go ahead and copy the file.
Add the code to your own and try it out. When you click your button, you should see the "File Copied" message box appear. If you look in the copiedFiles folder that you created, you should see the test1.txt file there.
Move a File
To move a file to a new location, you would use the Move method of the File class:
System.IO.File.Move( fileToMove, fileLocation );
Everything else is the same: type a file to move between the round brackets of theMove method. Then, after a comma, add the new location.
Don't forget to add your error checking as well!
Delete a File
To delete a file from your computer, you can use the Delete method of the File class:
System.IO.File.Delete( file_path );
In between the round brackets of Delete, you need the name and path of the file you are trying to get rid of. Be very careful when trying this one out because it really does delete it. You won't find the file in the Recycle bin.
Drawing Polygons in C# .NET
You can also draw irregular shapes, like Polygons. To do that, you set up a series of points, and hand them to the DrawPolygon method.
The first thing to do is to set up an array of points:
Point[] polygonPoints = new Point[5];
Point[] polygonPoints = new Point[5];
This sets up a new point array called polygonPoints. We're specified 5 sets of points. The points are X, Y coordinates. X is how far to the left you want the point and Y is how far down. You set them up like this:
polygonPoints[0] = new Point(113, 283);
polygonPoints[1] = new Point(70, 156);
polygonPoints[2] = new Point(180, 70);
polygonPoints[3] = new Point(290, 156);
polygonPoints[4] = new Point(250, 283);
polygonPoints[0] = new Point(113, 283);
polygonPoints[1] = new Point(70, 156);
polygonPoints[2] = new Point(180, 70);
polygonPoints[3] = new Point(290, 156);
polygonPoints[4] = new Point(250, 283);
So each slot in the array is filled with a new point. In between the round brackets of Point, you add your X, Y coordinates.
Once you have your points array, you can hand it to the DrawPolygon method:
surface.DrawPolygon( pen1, polygonPoints );
After specifying what you want to draw on (surface, for us), you type a dot followed by DrawPolygon. In between the round brackets of DrawPolygon you first need a pen. Then you need your points array. Note that the brackets of the array are not needed.
If you want to fill your polygon, you can use the FillPolygon method:
surface.FillPolygon( brushOne, polygonPoints );
FillPolygon needs a brush, and the points array again. When the above code is run, it will produce the following polygon:

What you need to get started with PHP
Before you can write and test your PHP scripts, there's one thing you'll
need - a server! Fortunately, you don't need to go out and buy one.
In fact, you won't be spending any extra money. That's why PHP is so
popular! But because PHP is a server-sided scripting language, you either
have to get some web space with a hosting company that supports PHP,
or make your computer pretend that it has a server installed. This is
because PHP is not run on your PC - it's executed on the server. The
results are then sent back to the client PC .
If you have OS X, then try these sites to get up and running with PHP:
Be sure to click the link for Presentation, as well as the link for Downloads. The Presentation page shows you how to install the file.
Apple Users
If you have OS X, then try these sites to get up and running with PHP:
http://www.onlamp.com/pub/a/mac/2001/12/07/apache.html
http://www.entropy.ch/software/macosx/php/
What you're doing here is getting the apache server up and running,
so that you can run PHP scripts offline. Pay particular attention to
where files are stored, and to the "localhost" address. Linux Users
There are quite a few sites out there to help Linux users get up and running with the Apache server and PHP. Here are three sites that are worth checking out:
http://en.wikipedia.org/wiki/LAMP_(software_bundle)
http://www.php-mysql-tutorial.com/wikis/php-tutorial/installing-php-and-mysql.aspx
http://www.phpfreaks.com/tutorials/12/0.php
If you know any better ones, we'd be interested in hearing from you!Windows Users
OK, back to Wampserver and Windows. First, you need to download the software. You can get it from here (this site is nothing to do with ours, by the way):Be sure to click the link for Presentation, as well as the link for Downloads. The Presentation page shows you how to install the file.
What is PHP, and why do I need it?
PHP is probably the most popular scripting language on the web. It
is used to enhance web pages. With PHP, you can do things like create
username and password login pages, check details from a form, create
forums, picture galleries, surveys, and a whole lot more. If you've
come across a web page that ends in PHP, then the author has written
some programming code to liven up the plain, old HTML.
PHP is known as a server-sided language. That's because the PHP doesn't get executed on your computer, but on the computer you requested the page from. The results are then handed over to you, and displayed in your browser. Other scripting languages you may have heard of are ASP, Python and Perl.
The most popular explanation of just what PHP stands for is "Hypertext Pre-processor". But that would make it HPP, surely? An alternative explanation is that the initials come from the earliest version of the program, which was called Personal Home Page Tools. At least you get the letters "PHP" in the right order!

 But PHP is so popular that if you're looking for a career in the web
design/web scripting industry then you just have to know it!
But PHP is so popular that if you're looking for a career in the web
design/web scripting industry then you just have to know it!
PHP is known as a server-sided language. That's because the PHP doesn't get executed on your computer, but on the computer you requested the page from. The results are then handed over to you, and displayed in your browser. Other scripting languages you may have heard of are ASP, Python and Perl.
The most popular explanation of just what PHP stands for is "Hypertext Pre-processor". But that would make it HPP, surely? An alternative explanation is that the initials come from the earliest version of the program, which was called Personal Home Page Tools. At least you get the letters "PHP" in the right order!
Cycle of a Normal Web Request
Cycle of a Web Request That Involves PHP

How To Send Mail From ASP.Net web Application Using C#
Wednesday, 5 September 2012
To See It Clear Run It On FullScreen View In YouTube
WPF: Flow Document
Friday, 31 August 2012
Flow documents are designed to optimize viewing and readability. Rather than being set to one predefined layout, flow documents dynamically adjust and reflow their content based on run-time variables such as window size, device resolution, and optional user preferences. In addition, flow documents offer advanced document features, such as pagination and columns.

// Add some Bold text to the paragraph
// Add the FlowDocument to a FlowDocumentReader Control

What is a Flow Document
A flow document is designed to "reflow content" depending on window size, device resolution, and other environment variables. In addition, flow documents have a number of built in features including search, viewing modes that optimize readability, and the ability to change the size and appearance of fonts. Flow Documents are best utilized when ease of reading is the primary document consumption scenario. In contrast, Fixed Documents are designed to have a static presentation. Fixed Documents are useful when fidelity of the source content is essential.
The following illustration shows a sample flow document viewed in several windows of different sizes. As the display area changes, the content reflows to make the best use of the available space.

As seen in the image above, flow content can include many components including paragraphs, lists, images, and more. These components correspond to elements in markup and objects in procedural code. We will go over these classes in detail later in the Flow Related Classes section of this overview. For now, here is a simple code example that creates a flow document consisting of a paragraph with some bold text and a list.
XAML:
<!-- This simple flow document includes a paragraph with some bold text in it and a list. -->
<FlowDocumentReader xmlns="http://schemas.microsoft.com/winfx/2006/xaml/presentation"
xmlns:x="http://schemas.microsoft.com/winfx/2006/xaml">
<FlowDocument>
<Paragraph>
<Bold>Some bold text in the paragraph.</Bold>
Some text that is not bold.
</Paragraph>
<List> <ListItem>
<Paragraph>ListItem 1</Paragraph>
</ListItem>
<ListItem>
<Paragraph>ListItem 2</Paragraph>
</ListItem>
<ListItem>
<Paragraph>ListItem 3</Paragraph>
</ListItem>
</List>
</FlowDocument></FlowDocumentReader>
C#
using System;
using System.Windows;
using System.Windows.Controls;
using System.Windows.Documents;
namespace SDKSample
{
public partial class SimpleFlowExample : Page
{
public SimpleFlowExample()
{
Paragraph myParagraph = new Paragraph();// Add some Bold text to the paragraph
myParagraph.Inlines.Add(new Bold(new Run("Some bold text in the paragraph.")));
// Add some plain text to the paragraph
myParagraph.Inlines.Add(new Run(" Some text that is not bold."));
// Create a List and populate with three list items.
List myList = new List();
// First create paragraphs to go into the list item.
Paragraph paragraphListItem1 = new Paragraph(new Run("ListItem 1"));
Paragraph paragraphListItem2 = new Paragraph(new Run("ListItem 2"));
Paragraph paragraphListItem3 = new Paragraph(new Run("ListItem 3"));
// Add ListItems with paragraphs in them.
myList.ListItems.Add(new ListItem(paragraphListItem1));
myList.ListItems.Add(new ListItem(paragraphListItem2));
myList.ListItems.Add(new ListItem(paragraphListItem3));
// Create a FlowDocument with the paragraph and list.
FlowDocument myFlowDocument = new FlowDocument();
myFlowDocument.Blocks.Add(myParagraph);
myFlowDocument.Blocks.Add(myList);
// Add the FlowDocument to a FlowDocumentReader Control
FlowDocumentReader myFlowDocumentReader = new FlowDocumentReader();
myFlowDocumentReader.Document = myFlowDocument;
this.Content = myFlowDocumentReader;
}
}
}
The illustration below shows what this code snippet looks like.
In this example, the FlowDocumentReader control is used to host the flow content. See Flow Document Types for more information on flow content hosting controls. Paragraph, List, ListItem, and Bold elements are used to control content formatting, based on their order in markup. For example, the Bold element spans across only part of the text in the paragraph; as a result, only that part of the text is bold. If you have used HTML, this will be familiar to you.
As highlighted in the illustration above, there are several features built into Flow Documents:
- Search: Allows the user to perform a full text search of an entire document.
- Viewing Mode: The user can select their preferred viewing mode including a single-page (page-at-a-time) viewing mode, a two-page-at-a-time (book reading format) viewing mode, and a continuous scrolling (bottomless) viewing mode. For more information about these viewing modes, see FlowDocumentReaderViewingMode.
- Page Navigation Controls: If the viewing mode of the document uses pages, the page navigation controls include a button to jump to the next page (the down arrow) or previous page (the up arrow), as well as indicators for the current page number and total number of pages. Flipping through pages can also be accomplished using the keyboard arrow keys.
- Zoom: The zoom controls enable the user to increase or decrease the zoom level by clicking the plus or minus buttons, respectively. The zoom controls also include a slider for adjusting the zoom level. For more information, see Zoom.
These features can be modified based upon the control used to host the flow content. The next section describes the different controls.
Display of flow document content and how it appears is dependent upon what object is used to host the flow content. There are four controls that support viewing of flow content: FlowDocumentReader, FlowDocumentPageViewer, RichTextBox, and FlowDocumentScrollViewer. These controls are briefly described below.
Note: FlowDocument is required to directly host flow content, so all of these viewing controls consume a FlowDocument to enable flow content hosting.
FlowDocumentReader
FlowDocumentReader includes features that enable the user to dynamically choose between various viewing modes, including a single-page (page-at-a-time) viewing mode, a two-page-at-a-time (book reading format) viewing mode, and a continuous scrolling (bottomless) viewing mode. For more information about these viewing modes, see FlowDocumentReaderViewingMode. If you do not need the ability to dynamically switch between different viewing modes, FlowDocumentPageViewer and FlowDocumentScrollViewer provide lighter-weight flow content viewers that are fixed in a particular viewing mode.
FlowDocumentPageViewer and FlowDocumentScrollViewer
FlowDocumentPageViewer shows content in page-at-a-time viewing mode, while FlowDocumentScrollViewer shows content in continuous scrolling mode. Both FlowDocumentPageViewer and FlowDocumentScrollViewer are fixed to a particular viewing mode. Compare to FlowDocumentReader, which includes features that enable the user to dynamically choose between various viewing modes (as provided by the FlowDocumentReaderViewingMode enumeration), at the cost of being more resource intensive than FlowDocumentPageViewer or FlowDocumentScrollViewer.
By default, a vertical scrollbar is always shown, and a horizontal scrollbar becomes visible if needed. The default UI for FlowDocumentScrollViewer does not include a toolbar; however, the IsToolBarVisible property can be used to enable a built-in toolbar.
RichTextBox
You use a RichTextBox when you want to allow the user to edit flow content. For example, if you wanted to create an editor that allowed a user to manipulate things like tables, italic and bold formatting, etc, you would use a RichTextBox. See RichTextBox Overview for more information.
Note: Flow content inside a RichTextBox does not behave exactly like flow content contained in other controls. For example, there are no columns in a RichTextBox and hence no automatic resizing behavior. Also, the typically built in features of flow content like search, viewing mode, page navigation, and zoom are not available within a RichTextBox.
Subscribe to:
Posts (Atom)


