Code To Disable X(Close) Button On Your Form

Friday, 8 July 2011
Just Add The Following Code Anywhere In Your Windows Application And Your X(Close) Button Will Be Disables.
private const int dis_close_button = 0x200;
protected override CreateParams CreateParams
{
get
{
CreateParams ObjCP = base.CreateParams;
ObjCP.ClassStyle = ObjCP.ClassStyle | dis_close_button ;
return ObjCP;
}
}

How To Draw Star On Your Windows Application

USING C#

  • First Of All Open New Windows Application.
  • Add Following Namespaces.

using System;
using System.Collections.Generic;
using System.ComponentModel;
using System.Data;
using System.Drawing;
using System.Text;
using System.Windows.Forms;
using System.Drawing.Drawing2D;

namespace Draw
{
public class DrawingForm : Form
{
public DrawingForm() //Create Constructor
{
//InitializeComponent
this.Text = "My drawings";
this.Size = new Size(600, 600);
this.Paint += new PaintEventHandler(MyPainting);
}

private void MyPainting(object sender, PaintEventArgs e)
{
Graphics G = e.Graphics;
G.SmoothingMode = SmoothingMode.HighQuality;

PointF[] Star1 = Calculate5StarPoints(new PointF(100f, 100f), 50f, 20f);
SolidBrush FillBrush = new SolidBrush(Color.Pink);
G.FillPolygon(FillBrush, Star1);
G.DrawPolygon(new Pen(Color.Purple, 5), Star1);

PointF[] Star2 = Calculate5StarPoints(new PointF(200f, 150f), 100f, 20f);
HatchBrush pat = new HatchBrush(HatchStyle.Cross, Color.RosyBrown, Color.IndianRed);
G.FillPolygon(pat, Star2);

PointF[] Star3 = Calculate5StarPoints(new PointF(350f, 300f), 200f, 100f);
LinearGradientBrush lin = new LinearGradientBrush(new Point(350, 100), new Point(350, 500),
Color.Salmon, Color.Cyan);
G.FillPolygon(lin, Star3);

PointF[] Star4 = Calculate5StarPoints(new PointF(140f, 400f), 120f, 10f);
G.DrawPolygon(new Pen(Color.LightSalmon, 3), Star4);
}
private PointF[] Calculate5StarPoints(PointF Orig, float outerradius, float innerradius)
{
double Ang36 = Math.PI / 5.0; // 36° x PI/180
double Ang72 = 2.0 * Ang36; // 72° x PI/180
float Sin36 = (float)Math.Sin(Ang36);
float Sin72 = (float)Math.Sin(Ang72);
float Cos36 = (float)Math.Cos(Ang36);
float Cos72 = (float)Math.Cos(Ang72);

PointF[] pnts = { Orig, Orig, Orig, Orig, Orig, Orig, Orig, Orig, Orig, Orig };
pnts[0].Y -= outerradius; // top off the star, or on a clock this is 12:00 or 0:00 hours
pnts[1].X += innerradius * Sin36; pnts[1].Y -= innerradius * Cos36; // 0:06 hours
pnts[2].X += outerradius * Sin72; pnts[2].Y -= outerradius * Cos72; // 0:12 hours
pnts[3].X += innerradius * Sin72; pnts[3].Y += innerradius * Cos72; // 0:18
pnts[4].X += outerradius * Sin36; pnts[4].Y += outerradius * Cos36; // 0:24
pnts[5].Y += innerradius;
pnts[6].X += pnts[6].X - pnts[4].X; pnts[6].Y = pnts[4].Y; // mirror point
pnts[7].X += pnts[7].X - pnts[3].X; pnts[7].Y = pnts[3].Y; // mirror point
pnts[8].X += pnts[8].X - pnts[2].X; pnts[8].Y = pnts[2].Y; // mirror point
pnts[9].X += pnts[9].X - pnts[1].X; pnts[9].Y = pnts[1].Y; // mirror point
return pnts;
}

private void InitializeComponent()
{
this.SuspendLayout();

this.ClientSize = new System.Drawing.Size(292, 266);
this.Name = "DrawingForm";
this.Load += new System.EventHandler(this.DrawingForm_Load);
this.ResumeLayout(false);

}

private void DrawingForm_Load(object sender, EventArgs e)
{
}
}

public class Program
{
[STAThread]
public static int Main()
{
Application.Run(new DrawingForm());
return 0;
}
}
}

USING VB
The Above Code Will Look As follows When Writen In VB.

Imports System.Collections.Generic
Imports System.ComponentModel
Imports System.Data
Imports System.Drawing
Imports System.Text
Imports System.Windows.Forms
Imports System.Drawing.Drawing2D

Namespace Draw
Public Class DrawingForm
Inherits Form

Public Sub New()


Me.Text = "My drawings"
Me.Size = New Size(600, 600)
AddHandler Me.Paint, New PaintEventHandler(AddressOf MyPainting)
End Sub

Private Sub MyPainting(sender As Object, e As PaintEventArgs)
Dim G As Graphics = e.Graphics
G.SmoothingMode = SmoothingMode.HighQuality

Dim Star1 As PointF() = Calculate5StarPoints(New PointF(100F, 100F), 50F, 20F)
Dim FillBrush As New SolidBrush(Color.Pink)
G.FillPolygon(FillBrush, Star1)
G.DrawPolygon(New Pen(Color.Purple, 5), Star1)

Dim Star2 As PointF() = Calculate5StarPoints(New PointF(200F, 150F), 100F, 20F)
Dim pat As New HatchBrush(HatchStyle.Cross, Color.RosyBrown, Color.IndianRed)
G.FillPolygon(pat, Star2)

Dim Star3 As PointF() = Calculate5StarPoints(New PointF(350F, 300F), 200F, 100F)
Dim lin As New LinearGradientBrush(New Point(350, 100), New Point(350, 500), Color.Salmon, Color.Cyan)
G.FillPolygon(lin, Star3)

Dim Star4 As PointF() = Calculate5StarPoints(New PointF(140F, 400F), 120F, 10F)
G.DrawPolygon(New Pen(Color.LightSalmon, 3), Star4)
End Sub

Private Function Calculate5StarPoints(Orig As PointF, outerradius As Single, innerradius As Single) As PointF()
Dim Ang36 As Double = Math.PI / 5.0
Dim Ang72 As Double = 2.0 * Ang36
Dim Sin36 As Single = CSng(Math.Sin(Ang36))
Dim Sin72 As Single = CSng(Math.Sin(Ang72))
Dim Cos36 As Single = CSng(Math.Cos(Ang36))
Dim Cos72 As Single = CSng(Math.Cos(Ang72))

Dim pnts As PointF() = {Orig, Orig, Orig, Orig, Orig, Orig, _
Orig, Orig, Orig, Orig}
pnts(0).Y -= outerradius

pnts(1).X += innerradius * Sin36
pnts(1).Y -= innerradius * Cos36

pnts(2).X += outerradius * Sin72
pnts(2).Y -= outerradius * Cos72

pnts(3).X += innerradius * Sin72
pnts(3).Y += innerradius * Cos72


pnts(4).X += outerradius * Sin36
pnts(4).Y += outerradius * Cos36

pnts(5).Y += innerradius

pnts(6).X += pnts(6).X - pnts(4).X
pnts(6).Y = pnts(4).Y


pnts(7).X += pnts(7).X - pnts(3).X
pnts(7).Y = pnts(3).Y

pnts(8).X += pnts(8).X - pnts(2).X
pnts(8).Y = pnts(2).Y
pnts(9).X += pnts(9).X - pnts(1).X
pnts(9).Y = pnts(1).Y
Return pnts
End Function

Private Sub InitializeComponent()
Me.SuspendLayout()

Me.ClientSize = New System.Drawing.Size(292, 266)
Me.Name = "DrawingForm"
AddHandler Me.Load, New System.EventHandler(AddressOf Me.DrawingForm_Load)
Me.ResumeLayout(False)

End Sub

Private Sub DrawingForm_Load(sender As Object, e As EventArgs)

End Sub
End Class

Public Class Program

Public Shared Function Main() As Integer
Application.Run(New DrawingForm())
 

Return 0
 

End Function
End Class
End Namespace

Unable to evaluate expression because the code is optimized or a native frame is on top of the call stack

Thursday, 7 July 2011
I got this error when using Response.Redirect in a Try-Catch. I'd never seen it before, but it is resolved by specifying 'false' after the URL like below. This tells the execution of the current page not to terminate: 

Response.Redirect("whatever.aspx",false);

Ajax Advantages And Disadvantages

Why use AJAX?

Building a web application that employs AJAX is more difficult than building it the classic way. You need to go to extra lengths to make sure that the user experience is and remains enjoyable, and not plain annoying. With all the hype going around AJAX, a lot of applications that do not have a real need for it have been built. These are toys meant to prove that AJAX is fun, but with little or no use in real-life situations. At the same time, some applications that do not use AJAX are labeled as such. You can find a list of AJAX applications by using a search engine, or directly here.

The decision whether an application would benefit from using AJAX or not is entirely up to the developer. Here are a few hints to help you take the right decision.
____________________________________________________________________
The Benefits of AJAX

To help you decide whether AJAX is for you or not, here are some of the advantages it has over classic web development techniques:
Everything has its own merits and demerits, Ajax included.
·         The application seems to become more responsive and interactive as the user gets the response without clicking any buttons.
·         In classic web application, when the web server responds to the web browser with a new page, it may make use of multiple connection threads in order to speed up the process, but this happens for the content only (which is between <body> tags). The CSS as well as the script files present in the head section are transferred using only one connection thread which results in performance degradation. With Ajax, it is required to load only the basic script and CSS files. Rests are requested as content using multiple connections.
·         A big advantage is that the user is not required to keep on waiting and waiting.
·         One more important merit is traffic to and from the server is reduced a considerable amount.
·         If a section of a page encounters any error, other sections do not get affected and the data entered by the user is also not lost.
______________________________________________________________
The Disadvantages of AJAX

As with most new web development techniques, AJAX has its critics. There are a couple of disadvantages that need to be considered before considering an AJAX-based solution:
Ajax application development may lead to increase in development time and cost.
·         The biggest concern is accessibility because all browsers do not completely support Javascript and xmlHttpRequest object.
·         Using Ajax to asynchronously load bits of data into the existing page conflicts the way the users are used to viewing, navigating and creating bookmarks in a modern browser.
·         Another disadvantage lies in the xmlHttpRequest object itself because one can use it to access information from the host that served the “initial page” (due to security reasons).

Exporting WebPage To PDF File

  • In This You Will See How To Export Your WebPages Into PDF File.
  • First Of All Open New Website.
  • And Add Following Code Into Default.aspx Page.
<%@ Page Language="C#" AutoEventWireup="true" 
CodeFile="Default.aspx.cs" Inherits="_Default" %>

<!DOCTYPE html PUBLIC "-//W3C//DTD XHTML 1.0 Transitional//EN"
"http://www.w3.org/TR/xhtml1/DTD/xhtml1-transitional.dtd">

<html xmlns="http://www.w3.org/1999/xhtml" >
<head runat="server">
    <title>Untitled Page</title>
</head>
<body>
    <form id="form1" runat="server">
    <div>
        <asp:GridView ID="GridView1" runat="server"
             AutoGenerateColumns="False"
             DataSourceID="SqlDataSource1" Width="257px">
        <Columns>
             <asp:BoundField DataField="Name"
                  HeaderText="Name"
                  SortExpression="Name" />
             <asp:BoundField DataField="Location"
                  HeaderText="Location"
                  SortExpression="Location" />
        </Columns>
        </asp:GridView>
        <asp:SqlDataSource ID="SqlDataSource1"
             runat="server"
        ConnectionString="<%$ ConnectionStrings:ConnectionString %>"
        SelectCommand="SELECT [Name], [Location] FROM [Test]">
        </asp:SqlDataSource>
   
    </div>
        <br />
        <asp:Button ID="btnExport" runat="server"
             OnClick="btnExport_Click"
             Text="Export to PDF" />
       
    </form>
</body>
</html>
  • Now Add Following Code Into Default.aspx.cs Page
  • Namespaces Used:
using System;
using System.Data;
using System.Configuration;
using System.Web;
using System.Web.Security;
using System.Web.UI;
using System.Web.UI.WebControls;
using System.Web.UI.WebControls.WebParts;
using System.Web.UI.HtmlControls;
using iTextSharp.text;
using iTextSharp.text.pdf;
using iTextSharp.text.html;
using System.IO;
using System.Collections;
using System.Net;

public partial class _Default : System.Web.UI.Page
{
    protected void btnExport_Click(object sender, EventArgs e)
    {
        HtmlForm form = new HtmlForm();
        form.Controls.Add(GridView1);
        StringWriter sw = new StringWriter();
        HtmlTextWriter hTextWriter = new HtmlTextWriter(sw);
        form.Controls[0].RenderControl(hTextWriter);
        string html = sw.ToString();
        Document Doc = new Document();
               
        //PdfWriter.GetInstance
        //(Doc, new FileStream(Request.PhysicalApplicationPath
        //+ "\\VishalRane.pdf", FileMode.Create));

        PdfWriter.GetInstance(Doc, new FileStream(Environment.GetFolderPath
        (Environment.SpecialFolder.Desktop)+ "\\VishalRane.pdf", FileMode.Create));
        Doc.Open();
       
        Chunk c = new Chunk("Export GridView to PDF Using iTextSharp \n",FontFactory.GetFont("Verdana", 15));
        Paragraph p = new Paragraph();
        p.Alignment = Element.ALIGN_CENTER;
        p.Add(c);
        Chunk chunk1 = new Chunk("By Vishal RANE, vishalrane50@gmail.com \n",FontFactory.GetFont("Verdana", 8));
        Paragraph p1 = new Paragraph();
        p1.Alignment = Element.ALIGN_RIGHT;
        p1.Add(chunk1);
            
        Doc.Add(p);
        Doc.Add(p1);
               
        System.Xml.XmlTextReader xmlReader =
        new System.Xml.XmlTextReader(new StringReader(html));
        HtmlParser.Parse(Doc, xmlReader);
       
        Doc.Close();
        string Path = Environment.GetFolderPath(Environment.SpecialFolder.Desktop)+ "\\VishalRane.pdf";


        ShowPdf(Path);
      
       
    }
  • Now To Show PDF Use Following Code:
    private void ShowPdf(string strS)
    {
        Response.ClearContent();
        Response.ClearHeaders();
        Response.ContentType = "application/pdf";
        Response.AddHeader("Content-Disposition","attachment; filename=" + strS);
        Response.TransmitFile(strS);
        Response.End();
        //Response.WriteFile(strS);
        Response.Flush();
        Response.Clear();

    }
   
}

Note:

The WebPage data will be converted into PDF file, You can also add details such as ur name etc by using

 Chunk chunk1 = new Chunk("By Vishal RAne, vishalrane50@gmail.com \n",FontFactory.GetFont("Verdana", 8));

The pdf will be saved on desktop....
u can change location by using

PdfWriter.GetInstance(Doc, new FileStream(Environment.GetFolderPath
(Environment.SpecialFolder.Desktop)+ "\\VishalRane.pdf", FileMode.Create));


If You Have Any Doubt You Can Add Your Doubts In Comment Section

How To Randomly Generate Verification Code

USING C#
Step 1:
  • Create A New Website.
  • Code For Default.aspx(Source)

<%@ Page Language="C#" AutoEventWireup="true" CodeFile="Default.aspx.cs" Inherits="_Default" %>
<!DOCTYPE html PUBLIC "-//W3C//DTD XHTML 1.0 Transitional//EN" "http://www.w3.org/TR/xhtml1/DTD/xhtml1-transitional.dtd">

<html xmlns="http://www.w3.org/1999/xhtml" >
<head runat="server">
    <title>Verification code to prevent auto signup in ASP.NET</title>
    </head>
<body>
    <form id="form1" runat="server">
    <div>
   
    </div>
    </form>
</body>
</html>

Step 2:
  • Code For Default.aspx.cs
  • Namespaces Used

using System;
using System.Collections;
using System.ComponentModel;
using System.Data;
using System.Drawing;
using System.Web;
using System.Web.SessionState;
using System.Web.UI;
using System.Web.UI.WebControls;
using System.Web.UI.HtmlControls;

public partial class _Default : System.Web.UI.Page
{
    protected void Page_Load(object sender, EventArgs e)
    {
        string checkCode = this.CreateRandomCode(6);
        Session["CheckCode"] = checkCode;
        CreateImage(checkCode);

    }

private void CreateImage(string checkCode)
    {
        System.Drawing.Bitmap image = new System.Drawing.Bitmap(Convert.ToInt32(Math.Ceiling((decimal)(checkCode.Length * 14))), 22);
        Graphics g = Graphics.FromImage(image);


        try
        {

            Random random = new Random();
            g.Clear(Color.AliceBlue);

            for (int i = 0; i < 25; i++)
            {
                int x1 = random.Next(image.Width);
                int x2 = random.Next(image.Width);
                int y1 = random.Next(image.Height);
                int y2 = random.Next(image.Height);

                g.DrawLine(new Pen(Color.Silver), x1, y1, x2, y2);
            }

            Font font = new System.Drawing.Font("Roman", 12, System.Drawing.FontStyle.Bold);
            System.Drawing.Drawing2D.LinearGradientBrush brush = new System.Drawing.Drawing2D.LinearGradientBrush(new Rectangle(0, 0, image.Width, image.Height), Color.CornflowerBlue, Color.DarkMagenta, 1.2f, true);
            g.DrawString(checkCode, font, new SolidBrush(Color.DarkMagenta), 2, 2);


            for (int i = 0; i < 100; i++)
            {
                int x = random.Next(image.Width);
                int y = random.Next(image.Height);

                image.SetPixel(x, y, Color.FromArgb(random.Next()));
            }

            g.DrawRectangle(new Pen(Color.Silver), 0, 0, image.Width - 1, image.Height - 1);

            System.IO.MemoryStream ms = new System.IO.MemoryStream();
            image.Save(ms, System.Drawing.Imaging.ImageFormat.Gif);
            Response.ClearContent();
            Response.ContentType = "image/Gif";
            Response.BinaryWrite(ms.ToArray());
        }
        finally
        {
            g.Dispose();
            image.Dispose();
        }
    }

public string CreateRandomCode(int codeCount)
    {
        string allChar = "0,1,2,3,4,5,6,7,8,9,A,B,C,D,E,F,G,H,I,J,K,L,M,N,O,P,Q,R,S,T,U,V,W,X,Y,Z";
        string[] allCharArray = allChar.Split(',');
        string randomCode = "";
        int temp = -1;

        Random rand = new Random();
        for (int i = 0; i < codeCount; i++)
        {
            if (temp != -1)
            {
                rand = new Random(i * temp * ((int)DateTime.Now.Ticks));
            }
            int t = rand.Next(36);
            if (temp != -1 && temp == t)
            {
                return CreateRandomCode(codeCount);
            }
            temp = t;
            randomCode += allCharArray[t];
        }
        return randomCode;
    }
}
Finally Screen Will Look Like Follows:
Yahoo Screen                                                                          This Code Output:


Activate Windows 7 Enterprise With OEM

Step 1:

Step 2:
How to activate windows 7 enterprise? Let’s Start  with Windows 7 Enterprise.

Step 3
Now, we need a software for activate windows 7 enterprise. You can download it by making  A search in Google “w7lxe-v10”. After download complete,double click on w7lxe-v10.exe as shown in figure.

Step 4:
You can also select manual mode. As shown in figure…do this.

 Step 5: 
After click on activate button as shown in figure..

 Step 6: 
Now restart your computer. And go to My Computer properties as shown in figure..
After Click on properties as shown in figure...

 Step 7:
Now your windows 7 enterprise edition is activated with OEM.

Install IIS7 In Windows 7 Enterprise Edition.


Step 1:

Open control panel or type in run command  appwiz.cpl  ---->add remove programs will be open as shown in figure.


Step 2:
After click turn windows features on or off , a new window will be be open as shown in figure... 


Step 3: 
New window open after click OK button as shown in figure...


Step 4:
Computer will be restart  after complete installation.
Now check your iis7  is working or not then you have to open browser and type http://localhost/  and enter
new page will be open as shown in figure.


Now your iis7 is installed.
 

How To Use Password Strength Control In Ajax And How To Modify Text

Wednesday, 6 July 2011
Step 1:
  • First Of All You Will Need Ajax Control Toolkit 4.0, You Can Get It From HERE
Step 2:
  • Open Visual Web Developer 2010.
  • Create New .aspx Page.
Your Web Form Will Look As Follows:


Step 3:
And Now ADD "PasswordStrength" Control From ToolBox.
And Set Following Properties
<asp:PasswordStrength ID="TextBox3_PasswordStrength" runat="server"
            TargetControlID="TextBox3"></asp:PasswordStrength>

Step 4:
So When You Will Run Your Web Form And Enter Value You Will Get Result As follow.

Step 5:

<asp:PasswordStrength ID="TextBox3_PasswordStrength" runat="server"
            TargetControlID="TextBox3" TextStrengthDescriptions="Too Short;Weak;Strong;Unbrekable"></asp:PasswordStrength>

 Thats It, Its Done...
If You Wnat Any Help Or Have Any Query Comment On This Post....

How To Use Themes/ HTML Templates In ASP.net

Tuesday, 5 July 2011
Step 1:
  • First of all download html template from..HERE
Step 2: 
  •  After Downloading The Template Unzip It On Desktop 
Step 3:
  • Now Create New Website...
  • Go To SolutionExplorer...
  • Rright Click->Add Existing Item->Locate That Folder->There Will Be One Index.html File In That Folder->Also Open The Images That Folder Have...->And Also The Default.css File In That Downloded Folder....
Step 4:
  • Now In Your Solution Explorer Double Click Index.html File->Now Copy The Code Of That Html File Starting From <HTML> To </HTML>
  • And Now Go To Default.aspx In Source Code Paste This Copied Data Between <HTML> </HTML> Tag Of aspx Page....

If You Have Any Problem You Can Response Back Using Comments...

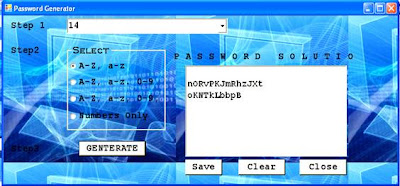
Password Generator Application

In This You Will See How To Generate Password As Per User Requirements.


Some points in the rar file are listed below:
  • The Password Will Be Generated As Per User.
  • The User Can Select Any Option From Group Box As You Can See In Image Above.
  • All The Password That User Will Generate Will Be Send To TextBox When User Click On GENERATE Button.
  • And The List Generated By User Can Also Be Save.
  • The Default Location Of File Will Be C:\PasswordList.txt
 Download Links:

Ajax Control Toolkit - Controls Disabled In ToolBox

Saturday, 2 July 2011
I Downloaded Visual Web Express And Ajax Control Toolkit. I Installed The Toolkit As Described HERE. But Nothing Appeared On My Toolbox. Thinking That I Might Have Missed Something, I Tried To Repeat The Process. When I Was Giving The Name During The Tab Creation Step, VWD Responded By Saying That Tab Name "AJAX Toolkit" Already Exists.
I Was Surprised To Know That The Tab Has Been Successfully Created But It Was Not Dislayed. Then By Just Playing Around With Different Options, I Clicked 'Show All'  Option Of Toolbox . Checking This Option Showed Me A Number Of Tabs Which I Haven't Seen Earlier.  Look At Belows Two Pictures.


This Also Showed Me My 'Ajax Toolkit' Tab. But All The Controls In This Tab Disabled. I Had Code View Of A aspx Page Opened On The Screen. Thinking That These Might Get Active On The Design View, I Switched To It. But This Did Not Worked.
Then I Restart VWD And Opened The Website Again. But Still These Are Grayed Out. So I Searched On Net It Gave Me Two Solutions As Given Below:

Solution 1:
  • Restart Visual Web Express. If it does not work,
  • Restart the PC.

Solution 2:

  • Close VWb and any other express product installed running such as Visual C# EE.
  • Open windows explorer and navigate to the 'C:\Documents and Settings\<your user name>\Application Data\Microsoft\VWDExpress\9.0' folder. 
  • You might have to enable 'Show Hidden Files' under the folder options' View tab.
  • Delete any .pdb file, you found in this folder.
  • Start VWD and reinstall.
 But None Of Them Helped Me....
But Finally I Got How To Make Controls Enabled From One Of My Experience Friend. Which Is Described Below.

Solution 3:
  • Open Visual Web Developer And Create A New Website....
  • And Right Click In Solution Explorer And Select "Start Options...."
  • Now It Will Open One Window As Shown Below....

  • Now In Above Window Select Build Option And In Target Framework Make It As .Net Framework 4
  • Its All Done Now Your All Controls Will Become Enabled.

Installing AJAX Control Toolkit 4 In Visual Web Developer 2010.

Friday, 1 July 2011
eerWant to Install AJAX Toolkit Just Follow Following Steps.....

Step 1:
  • Download Ajax Control ToolKit 4 From HERE
  • Extract It Into The Folder Name It AJAX ToolKit 4”
Step 2:
Open Visual Web Developer 2010 And Right Click On ToolBox And Select “Add Tab” As Shown In Picture Below.

Step 3:
After Creating It Name It Whatever You Want In My Case AJAX Toolkit”. As Shown In Picture Below.


Step 4:
Now Select That Tab And Right Click On It And Select “Choose Items..” As Shown In Picture Below.


Step 5:
It Will Now Open One Window Saying “Choose ToolBox Items” Make Sure That “.Net Framework Component” Tab Is Selected And Click Browse button On Bottom.


Step 6:
Now Locate That Extracted Folder And Locate “AjaxControlToolkit.dll” File In That Folder As Shown In Picture Below.


Step 7:
Now It Will Load All The Tools Of Ajax 4 And Will Show You All Of Then With CheckBox Value Enabled.


Step 8:
Its Done You Have Got All Your Ajax Controls Now You Can Start Working On It.