


QTP
|
Selenium
|
Can test both web and desktop applications
|
Can only test web applications
|
Comes with a built-in object repository
|
Has no built-in object repository
|
Automates faster than Selenium Because it is a fully featured IDE.
|
Automates at a slower rate Because it does not have a native IDE and only third party IDE can be used for development
|
Data-driven testing is easier to perform Because It has built-in global and local data tables .
|
Data-driven testing is more cumbersome since you have to Rely on the programming language's capabilities for setting values for your test data
|
Can access controls within the browser (such as the Favorites bar, Address bar, Back and Forward buttons, etc.)
|
Can not access elements outside of the web application under test
|
Provides professional customer support
|
No official user support is being offered.
|
Has native capability to export test data into external formats
|
Has no native capability to export runtime data onto external formats
|
Support Parameteriza- station is built
|
Parameteriza- station can be done through programming but is kettle to implement.
|
Test Reports are generated automatically
|
No native support to generate test / bug reports.
|

Advantages of QTP over Selenium
Wednesday, 6 May 2015
Advantages of Selenium over QTP
Selenium
|
QTP
|
Open source, free to use, and free of charge.
|
Commercial.
|
Highly extensible
|
Limited add-ons
|
Can run tests across different browsers
|
Can only run tests in Firefox , Internet Explorer and Chrome
|
Supports various operating systems
|
Can only be used in Windows
|
Supports mobile devices
|
Supports mobile device
using 3rd party
software
|
Can execute tests while the browser is minimized
|
Needs to have the
application under test to be visible on the desktop
|
Can execute tests in parallel.
|
Can only execute in
parallel but using Quality Center which is again a paid product.
|
Introduction of WebDriver
The WebDriver proves itself to be better than both Selenium IDE and Selenium RC in many aspects. It implements a more modern and stable approach in automating the browser's actions. WebDriver, unlike Selenium RC, does not rely on JavaScript for automation. It controls the browser by directly communicating to it.
The supported languages are the same as those in Selenium RC.
- Java
- C#
- PHP
- Python
- Perl
- Ruby

Introduction of Selenium Remote Control (Selenium RC)
Selenium RC was the flagship testing framework of the whole Selenium project for a long time. This is the first automated web testing tool that allowed users to use a programming language they prefer.As of version 2.25.0, RC can support the following programming languages:
- Java
- C#
- PHP
- Python
- Perl
- Ruby

Introduction of Selenium IDE
Selenium Integrated Development Environment (IDE) is the simplest framework in the Selenium suite and is the easiest one to learn. It is a Firefox plugin that you can install as easily as you can with other plugins. However, because of its simplicity, Selenium IDE should only be used as a prototyping tool. If you want to create more advanced test cases, you will need to use either Selenium RC or WebDriver.

How to Setup and Configure Selenium Webdriver With Eclipse and Java.
Friday, 1 May 2015
Step
1:
In the first step, download and
install JDK (Java Development Kit) in your system.
For downloading Java, you need
to visit the following link:

Step 2

Step 3
Download the Selenium Java
Client Driver from:

Click on the download link for
Java language, you will get a ZIP file named “selenium-2.43.0.zip”.
Then extract the contents of
this ZIP file on any location say “D:\selenium-2.43.0\”.
The unzipped folder contains the
‘libs’ folder, 2 jar files and Change
Log.
Step 4
Configure Eclipse to work with
Webdriver:
Double click on ‘Eclipse.exe’
to launch eclipse
When asked to select for a
workspace, just accept the default location. Or, you can change the location.

Create a new project through File -> New -> Java Project.
Name the project as “
MyProject”.
Right-click on the newly created
project and select New > Package, and name that package as “
MyPackage”.
Create a new Java class under
MyPackage by right-clicking on it and then selecting New > Class, and
then name it as “MyClass”.
Your Eclipse IDE should look
like the image below:

Step 5
Add Jar Files to the Library:
Right-click on

MyProject and select “Build Path” and then “Configure Build Path”.
This will open the Libraries tab
in Properties dialog. Then on click “Add External JARs...”
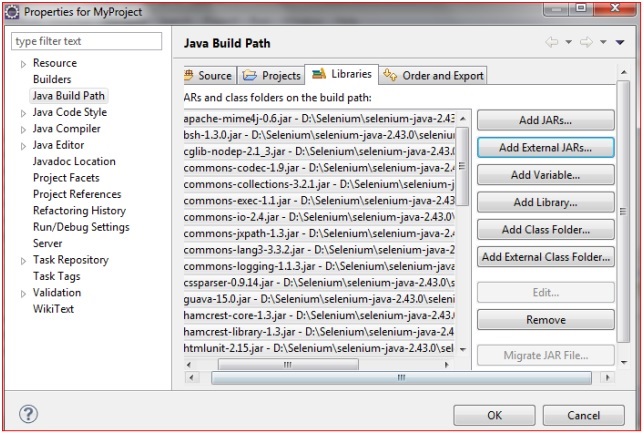
Navigate to D:\selenium-2.43.0\ (or any other location where you saved
the extracted contents of “selenium-2.43.0.zip”).
Add all the JAR files inside and outside the “libs”
folder.
These are the Jar files present
outside the Libs folder:

These are the Jar files present
inside the Libs folder:
Then your Properties dialog should look similar to the image
below:

Finally, click on the OK button and we are done with importing
Selenium libraries into our project. Now, we are ready to write our test script
in Eclipse and run it in WebDriver.
Simple example of creating a
webdriver script with explanation in the form of comments.
For this, we need to write the
following code into Eclipse:
package MyPackage;
import org.openqa.selenium.WebDriver;
import org.openqa.selenium.firefox.FirefoxDriver;
public class MyClass {
public static void main(String[] args) {
//Create a new instance of Firefox Browser
WebDriver driver = new FirefoxDriver();
//Open the URL in firefox browser
driver.get("https://www.google.co.in/");
//Maximize the Browser window
driver.manage().window().maximize();
//Get the current page URL and store the value in variable 'str'
String str = driver.getCurrentUrl();
//Print the value of variable in the console
System.out.println("The current URL is " + str);
}
}
Now, click on the Run Menu of
the Eclipse window to execute the script.
As an output, it will open the Firefox
browser, maximize the browser window, get the current page URL and print the
value in the console.
Download Win32OpenSSL_Light-0_9_8k
Thursday, 22 November 2012
Implement Security In WCF
To Implement Security In WCF you need to ensure that Win32OpenSSL_Light-0_9_8k is installed on your computer. In addition, you need to copy the openssl.conf file in C:\OpenSSL\bin folder
To Download Win32OpenSSL_Light-0_9_8k click here
To Download openssl.conf click here
To Implement Security In WCF you need to ensure that Win32OpenSSL_Light-0_9_8k is installed on your computer. In addition, you need to copy the openssl.conf file in C:\OpenSSL\bin folder
To Download Win32OpenSSL_Light-0_9_8k click here
To Download openssl.conf click here
How to Copy, Delete a File in C# .NET
Saturday, 22 September 2012
You can copy a file quite easily. It's done with the File class of System.IO. Let's see how. First create a new folder on your C drive. Give it the name copiedFiles.
Add a new button to your form. Double click to get at the code, and set up the following files and directory paths:
string fileToCopy = "C:\\test1.txt";
string newLocation = "C:\\copiedFiles\\test1.txt";
string folderLocation = "C:\\copiedFiles";
string fileToCopy = "C:\\test1.txt";
string newLocation = "C:\\copiedFiles\\test1.txt";
string folderLocation = "C:\\copiedFiles";
So the file we want to copy is test1.txt and it is in the root folder of the C drive. We want to copy it to a new location. The folder (Directory) we want to copy it to is called copiedFiles. We added a Folder Location, because we want to check if this Directory exists.
To copy a file, you use the Copy method of the File class:
System.IO.File.Copy( fileToCopy, newLocation );
In between the round brackets of Copy, you need a file to copy and the new location of the file you're trying to copy.
When the error checking is done as well, our code looks like this:

The code checks to see if the Directory exists. If it does, then we check to see if the file exist. If all is OK, then we go ahead and copy the file.
Add the code to your own and try it out. When you click your button, you should see the "File Copied" message box appear. If you look in the copiedFiles folder that you created, you should see the test1.txt file there.
Move a File
To move a file to a new location, you would use the Move method of the File class:
System.IO.File.Move( fileToMove, fileLocation );
Everything else is the same: type a file to move between the round brackets of theMove method. Then, after a comma, add the new location.
Don't forget to add your error checking as well!
Delete a File
To delete a file from your computer, you can use the Delete method of the File class:
System.IO.File.Delete( file_path );
In between the round brackets of Delete, you need the name and path of the file you are trying to get rid of. Be very careful when trying this one out because it really does delete it. You won't find the file in the Recycle bin.
Subscribe to:
Posts (Atom)


 Posts
Posts



